The Ultimate CoPilot Guide: Enabling Microsoft CoPilot in a Comprehensive Manner

Welcome to another FileCatchers Guide, where we delve into the technical aspects of various unified communication solutions. In this article, we present the ultimate CoPilot Guide, providing a detailed walkthrough to enable and utilize Microsoft CoPilot effectively. This comprehensive guide will help you harness the power of CoPilot, Microsoft’s intelligent assistant for troubleshooting and optimizing your communication systems.
Overview of Microsoft CoPilot:
Microsoft CoPilot is an innovative tool designed to simplify the management and troubleshooting of unified communication solutions. By leveraging artificial intelligence and machine learning, CoPilot can proactively identify and resolve potential issues, ensuring smooth and uninterrupted communication experiences for users.
What is Microsoft Copilot?
Before discussing how to enable Microsoft Copilot, let’s start with a brief overview of the technology and how it works. As mentioned above, Copilot is an AI assistant created by Microsoft and powered by major language modeling technology.
Part of what makes Microsoft Copilot attractive to businesses looking for a general AI solution is its ability to integrate with Microsoft Graph and other Microsoft tools. This means that Copilot can pull information from different parts of the Microsoft ecosystem. For example, when you write emails using Copilot on Outlook, you can pull in notes and information from SharePoint, Meetings, and Microsoft Office tools.
Copilot is designed to streamline workflows, increase productivity and efficiency, and improve performance in every part of the digital workspace. It has received very positive feedback from early testers and is expected to be fully rolled out to business users by November 2023.
Notably, Copilot can be accessed in two different ways. First, businesses can access Copilot’s consolidated AI capabilities in the tools they already use, such as Teams, Microsoft Outlook, Word, Excel, PowerPoint, and more. Second, Copilot is also included in the “Business Chat” or “Bing Chat” solution for all Microsoft users.
Key Steps to Enable Microsoft CoPilot:
- Licensing and Activation: To begin, ensure that your organization has the appropriate licensing for Microsoft CoPilot. Once verified, activate CoPilot within your unified communication system by following the recommended procedures outlined in this guide.
- System Integration: Integrating CoPilot with your existing unified communication platform is crucial for maximizing its capabilities. This guide provides step-by-step instructions on integrating CoPilot seamlessly with popular systems such as Microsoft Teams, Skype for Business, and Exchange Online.
- Configuration and Customization: CoPilot offers extensive configuration options to tailor its behavior to your organization’s unique requirements. This guide explores various configuration settings, allowing you to customize CoPilot’s proactive monitoring, alerting thresholds, and troubleshooting capabilities as per your preferences.
- Monitoring and Issue Detection: Learn how to leverage CoPilot’s advanced monitoring capabilities to gain real-time insights into the health and performance of your unified communication infrastructure. Discover how CoPilot can automatically detect and analyze potential issues, helping you preemptively address them before they impact your users.
- Troubleshooting and Remediation: In this guide, we provide detailed instructions on utilizing CoPilot’s troubleshooting features to identify the root cause of communication issues. Explore the intelligent diagnostics and guided remediation steps offered by CoPilot, empowering your IT team to resolve problems swiftly and effectively.
Buy Microsoft Copilot:
Before you enable Microsoft Copilot for all your apps and tools, you’ll need to take some important steps, starting with purchasing a license. Unfortunately, while some predicted that Microsoft would integrate Copilot into its tools as a free service, that was not the case.
In July, Microsoft announced official pricing for the Copilot service at the Inspire partner show. The price is very high, costing $30 per user per month. This includes additional costs to your existing Microsoft subscription. You will still need a Microsoft plan in addition to Copilot, such as Microsoft Business Standard, Premium, E3, or E5.
The good news is that Bing Chat Enterprise, Microsoft’s AI-powered chat solution, is included in the above plans at no additional cost. The service can also be purchased as a standalone solution for $5/month per user.
Where can you activate Microsoft Copilot?
Microsoft integrates Copilot into almost every aspect of its technology suite. The solution will be available in Word, Excel, PowerPoint, Outlook, Teams and Teams Phone. This assistant will also be added to Microsoft Viva, Microsoft Loop, SharePoint and Power Platform.
Microsoft even offers a solution specifically for sales teams called “Sales Copilot”. It’s worth noting that Copilot will now automatically replace the “Cortana” service previously available from Microsoft through Bing Chat Enterprise.
As Microsoft continues to invest in general AI and large language models through its partnership with OpenAI, it’s likely that additional Copilot tools will emerge. Follow the Microsoft Product Roadmap for all the latest updates. How to activate Microsoft Copilot:
Prerequisites
As mentioned above, there are some prerequisites for activating Microsoft Copilot. First, you’ll need to sign up for Copilot and have your plan approved. Currently, you will need a Microsoft 365 E5, E3 account, as well as:
- Access to Microsoft 365 apps for business
- Entra IDs (formerly Azure Active Directory accounts) for all users
- Access to Microsoft OneDrive (for file recovery and other features)
To access Microsoft for Outlook, Teams, or Microsoft Loop, you also need to ensure that all of these solutions are available and enabled for your tenant.
Additionally, the device of the user accessing Microsoft Copilot must be on the “Monthly Business Channel” or “Current Channel”. In November 2023, Copilot will first be rolled out on the existing channel before appearing on the Enterprise channel a month later.
From a network perspective, Copilot services connect to endpoints included in the Microsoft 365 endpoint taxonomy. Microsoft recommends that you ensure that your network complies with the Microsoft 365 connectivity guidelines described here for minimal latency.
Because many different Copilot experiences for solutions like Loop, Teams, PowerPoint, Excel, and Word use WebSocket connections, you’ll also need to enable WebSocket connections.
In conclusion, the ultimate CoPilot Guide offers comprehensive insights and step-by-step instructions to enable and leverage Microsoft CoPilot for enhanced unified communication management. By following this guide, you can unlock the full potential of CoPilot’s intelligent assistant capabilities, ensuring a seamless and optimized communication experience for your organization.
Harness the power of Microsoft CoPilot today by exploring our comprehensive guide and taking your unified communication management to new heights!
How to assign licenses to Microsoft Copilot
To ensure that users in your organization can enable and access Copilot, you will need to specify a license. Admins can do this using the Microsoft 365 admin center. You can also follow the steps available in the Microsoft 365 Copilot setup guide if you haven’t provisioned tenant users.
If you have provisioned users in your tenant, navigate to your Microsoft 365 admin tenant to enable Copilot for individual users or for your entire tenant. You can also do this through PowerShell using the Set-MsolUserLicen cmdlet. Once users are licensed to use Copilot, they will have immediate access to experiences in their Microsoft applications. For some applications such as Word and Copilot, the dialog box appears automatically when the user creates a new document.
In other environments, users must click the Copilot button in the menu ribbon (like on Microsoft Teams). Microsoft recommends that you enable feedback settings for Copilot so you can collect information about your user experience. Additionally, you can use the Microsoft 365 Copilot Usage Report to better understand user adoption, retention, and engagement. Full reports are available in the Microsoft 365 admin center through “Reports” and “Usage.”
How to activate Microsoft Copilot for Windows 11
At the Build 2023 conference in May, Microsoft announced “Windows Copilot” for Windows 11 users. Designed to accelerate productivity for businesses around the world, Windows Copilot turns every user into a “user”. use it fluently”.
This solution essentially acts as a personal assistant, allowing users to quickly customize settings, connect to their favorite apps, and more. With Copilot, you can access all the features you love in Windows, from copy and paste to capture tools and instant support. However, you can also ask Windows Copilot various questions and request help with certain tasks.
For example, users can ask Windows Copilot to rewrite or summarize content. You can also use this tool, similar to Bing Chat AI, to quickly access information from around the web.
Preview versions of Copilot for Windows 11 began rolling out to specific users in June. To activate Microsoft Copilot for Windows 11 today, you need to be running the “Windows Insider” version of Windows 11 for Windows 11. for developers.
How to Enable Microsoft Copilot in Word
To add Microsoft Copilot in Word and enable the AI chatbot, follow these step-by-step instructions with screenshots:
Step 1: Open the Registry Editor
Press the Windows key on your keyboard to open the Start menu. Then, type “regedit” in the search bar. Click on the “Registry Editor” app that appears as the top result.
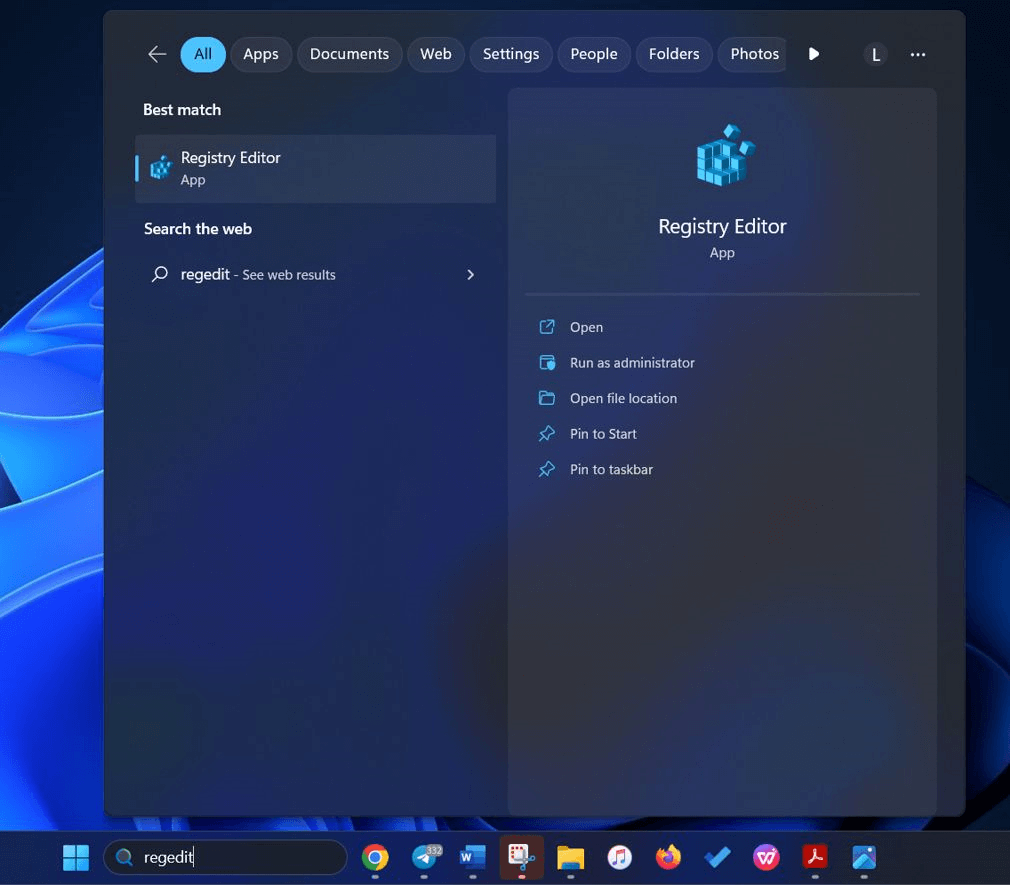
Registry Editor
Step 2: Navigate to the Word Registry Path
In the Registry Editor, navigate to the following path:
HKEY_CURRENT_USER\Software\Microsoft\Office\16.0\Common\ExperimentConfigs\ExternalFeatureOverrides\word
Step 3: Add a New String Value
Right-click on the “word” key, and from the menu, select “New,” then click on “String Value.”


Registry Editor Word Key
Step 4: Name the New Key
Name the newly created key as “Microsoft.Office.Word.CoPilotExperiment” and press Enter.
Step 5: Set the Value for Copilot
Double-click on the “Microsoft.Office.Word.CoPilotExperiment” key. In the “Edit String” dialog box, set its value to “true” to enable Copilot.
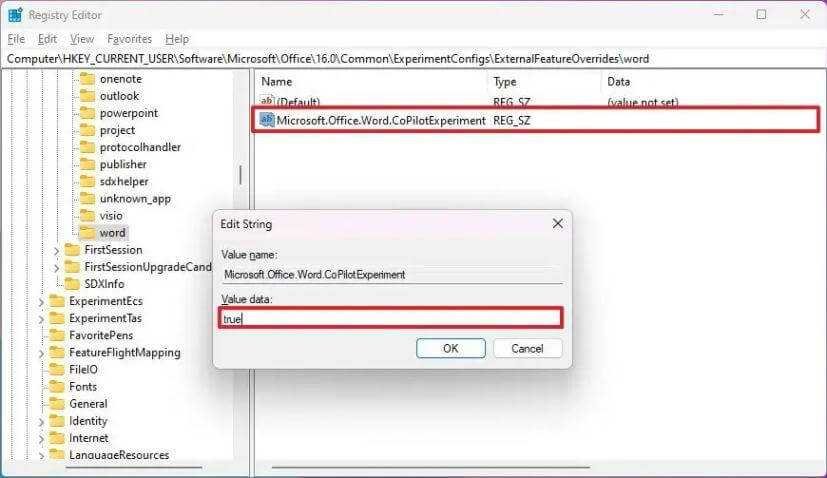

Registry Editor String Edit
Step 6: Confirm the changes
Click the “OK” button to confirm the changes.
Step 7: Restart Your Computer
Finally, to apply the changes and enable Microsoft Copilot in Word, restart your computer.
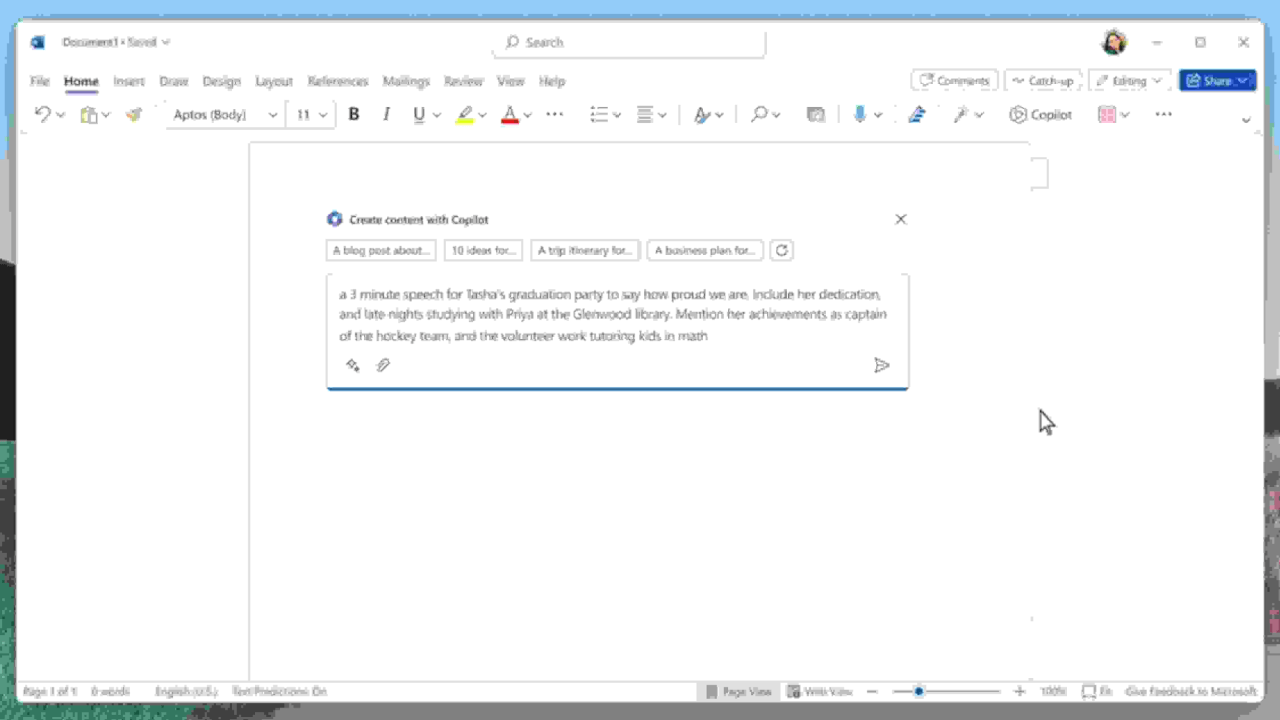

Copilot AI
Now, when you open Microsoft Word, Copilot AI chatbot will be enabled, offering you AI-powered code assistance and enhanced productivity within your Word documents. Happy coding with Microsoft Copilot in Word!
How to Enable Microsoft Copilot in Outlook
Follow these steps to enable Microsoft Copilot in Outlook for AI-powered assistance in writing better emails:
How to Enable Microsoft Copilot in Outlook
Follow these steps to enable Microsoft Copilot in Outlook for AI-powered assistance in writing better emails:
Step 1: Open Microsoft Outlook
Launch Microsoft Outlook on your computer.
Step 2: Navigate to “File”
Click on the “File” tab located at the top left corner of the Outlook window.
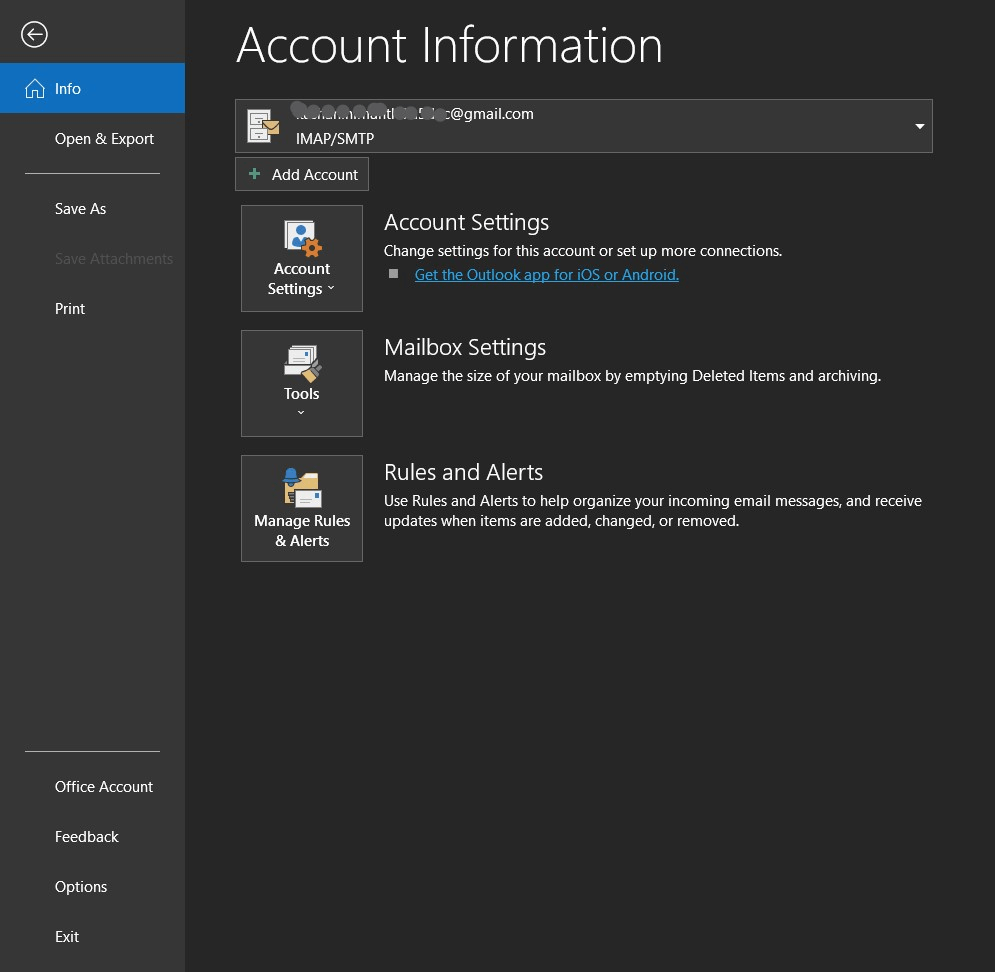

Outlook
Step 3: Access “Options”
From the drop-down menu, select “Options” at the bottom of the left-hand side menu.
Step 4: Choose “Mail”
In the Outlook Options window, select “Mail” from the left-hand side menu.


Outlook options
Step 5: Open “Editor Options”
Go to the “Compose messages” section and click on the “Editor Options” button.
Step 6: Select “Proofing” Tab
In the Editor Options window, navigate to the “Proofing” tab.


Outlook Editor options
Step 7: Enable Copilot
Check the box next to “Use Copilot to help me write better emails.”
Step 8: Save Changes
Click the “OK” button to save the changes and enable Microsoft Copilot in Outlook.


Microsoft Copilot in Outlook
Now, with Microsoft Copilot activated in Outlook, you’ll receive AI-driven suggestions and assistance while composing emails, helping you write more efficiently and effectively. Enjoy the benefits of AI-powered email composition with Microsoft Copilot in Outlook!
How to Enable Microsoft Copilot in Excel
To add Microsoft Copilot in Excel and enable the AI chatbot, follow these step-by-step instructions:
1. Open the Start menu on Windows 11.
2. Search for “regedit” and click the top result to open the Registry Editor.


Registry Editor
3. Navigate to the following path in the Registry Editor:
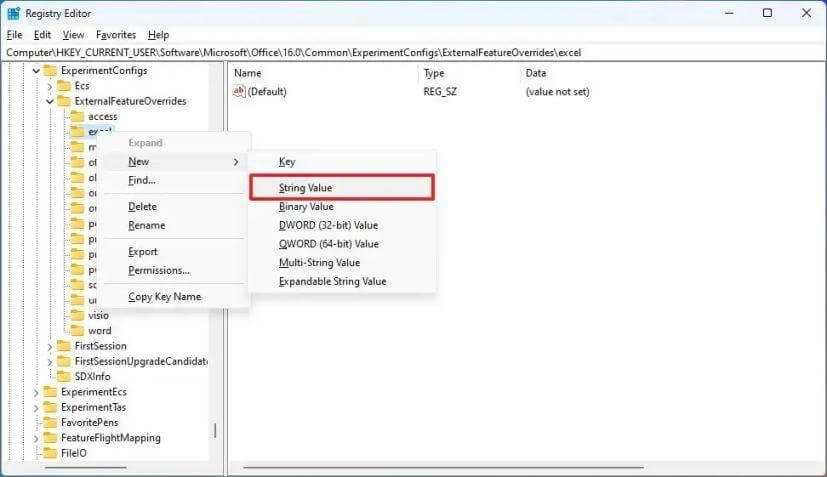
HKEY_CURRENT_USER\Software\Microsoft\Office\16.0\Common\ExperimentConfigs\ExternalFeatureOverrides\excel
- Right-click on the “excel” key, select “New,” and then click on “String Value.”

Registry Editor Excel Key
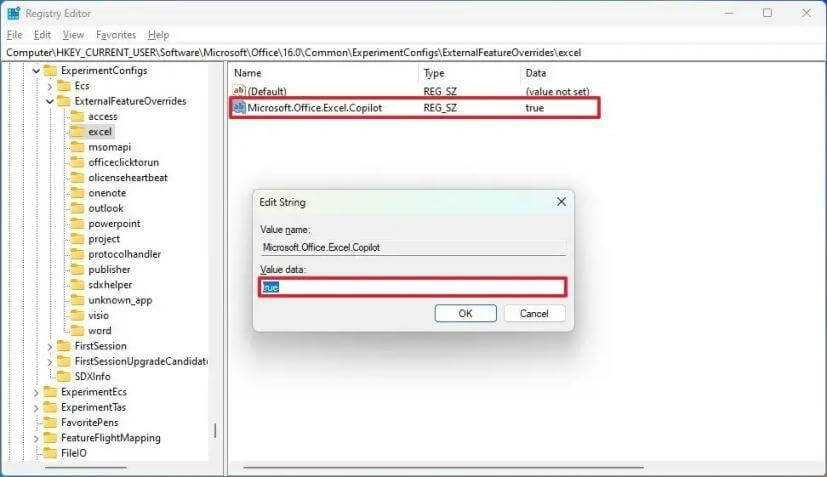
4. Name the new key “Microsoft.Office.Excel.Copilot” and press Enter.
5. Double-click on the “Microsoft.Office.Excel.Copilot” key and set its value to “true” to enable Copilot.

Registry Editor String Edit
6. Click the “OK” button to confirm the changes.
7. Restart your computer to apply the changes.


Copilot in Excel
Once you’ve completed these steps and restarted your computer, open or re-open Microsoft Excel, and you should see the Copilot experience on the right side. Please note that since this is an early preview, the feature may work with varying degrees of accuracy and completeness.
How to Enable Microsoft Copilot in PowerPoint
To enable Microsoft Copilot in PowerPoint and benefit from its AI-powered design suggestions and talking points, follow these steps:
1. Ensure you have a Microsoft 365 subscription and have the latest version of PowerPoint installed on your device.
2. Open a new PowerPoint presentation or an existing one.
3. Click on the “Home” tab in the ribbon at the top of the PowerPoint window.


PowerPoint presentation
4. Click on the “Copilot” button to open the Copilot panel on the right side of the PowerPoint window.


Copilot in PowerPoint
5. If this is your first-time using Copilot, you will be prompted to choose the type of presentation you want to create. Choose the appropriate option and click “Create.”
6. Copilot will generate a list of design ideas, images, and talking points for your presentation. You can use these suggestions as a starting point for your presentation or customize them to better fit your needs and preferences.
With Microsoft Copilot enabled in PowerPoint, you’ll have access to AI-driven assistance in designing your presentations and generating talking points, making it easier and more efficient to create compelling and visually appealing slides. Enjoy the benefits of AI-powered design assistance with Microsoft Copilot in PowerPoint!

